| Welcome, Guest |
You have to register before you can post on our site.
|
| Forum Statistics |
» Members: 5
» Latest member: Koda
» Forum threads: 5
» Forum posts: 5
Full Statistics
|
| Online Users |
There are currently 3 online users.
» 0 Member(s) | 3 Guest(s)
|
|
|
| BarrageRSPS Item Workbench — Equipment Perks & Recommended Setups |
|
Posted by: barrage bro - 10-02-2026, 02:47 AM - Forum: Misc Guides
- No Replies
|
 |
BarrageRSPS Item Workbench Guide
Item breakdowns • Equipment perks • Recommended setups
The Item Workbench turns unwanted equipment into upgrade materials and lets you attach perks to weapons, armour and jewellery. This guide covers the process, all 19 equipment perks and recommended choices for 13 equipment slots or items.
Contents
1. Breaking down equipment
2. Attaching and improving perks
3. Complete equipment-perk list
4. Recommended perks by slot and item
5. Planning your upgrades
1. Breaking down equipment
Right-click the Item Workbench and select Item-Breaking. Eligible equipment can be disintegrated into minerals and enhancers used for upgrades. Eligible items include certain clue rewards and equipment obtained from monsters, bosses and raids.
- Choose the eligible item you want to break down.
- Check the item and its tier before continuing.
- Use Disintegrate to convert it into materials.
Breaking down an item destroys it permanently. The process cannot be undone. Keep equipment you still use or intend to sell.
Higher breakdown tiers provide a better material return. Use the Item Breakdown Tiers guide to check the full item list before sacrificing valuable gear.
2. Attaching and improving perks
Once you have the required materials, use the Workbench’s perk-attachment interface to upgrade compatible equipment.
- Choose the equipment and the perk you want to attach.
- Use Add Minimum Ingredients to supply the minimum required materials.
- If you want better upgrade odds, add extra minerals and enhancers. You can supply up to three times the minimum ingredient requirement.
- Review the displayed ingredients and chances, then select Attach Perk.
An attachment rolls a perk level from 1 to 5. Level 5 is the rarest result. Higher levels improve the perk’s effect. When upgrading the same perk already attached to an item, the new roll cannot fall below that perk’s existing level.
Read the current interface: The screenshot illustrates the controls and displayed chances. Check the actual values shown for your chosen item and ingredient amount before attaching a perk; extra materials improve your odds but do not guarantee Level 5.
3. Complete equipment-perk list
These are perks attached to equipment through the Workbench. They are separate from the bonuses listed in the general Perks guide.
Quick Step
Boot-slot perk that can award Agility experience when you earn experience in another skill.
Precision Strike
Weapon perk that can bypass the target’s Defence. Its minimum damage depends on your maximum hit and perk level.
Fully Loaded
Can preserve charges on charged items. Level 5 is described as preserving every charge, making the item effectively unlimited while the perk applies.
Clue Hunter
Ring-slot perk that boosts clue-scroll drop chance by 10% per level, reaching 50% at Level 5. Clues are automatically collected when inventory space is available.
Elemental Fury
Adds 10% damage per level to elemental spells from the Standard Spellbook, reaching 50% at Level 5. Applies when attached to your weapon.
Burning Fury
Weapon perk that can apply a damaging burn. Both the burn’s duration and damage scale with perk level.
Elemental Convergence
Weapon perk that can produce a second cast when using elemental spells from the Standard Spellbook.
Soul Reaver
Weapon perk that can deal an additional hit equal to 2% of the target’s current Hitpoints per level. At Level 5, the hit is 10% of the target’s current Hitpoints.
Immortal Fortitude
While your health is below 25%, absorbs 10% of incoming damage per level. Level 5 absorbs 50%.
Eternal Regeneration
Speeds up natural Hitpoints regeneration according to perk level. Level 5 regenerates health five times as fast as normal.
Berserker Rage
Weapon perk that activates below 50% health: attack twice as fast, gain a 200% accuracy boost and gain 10% damage per level. Duration is 16 × level ticks; cooldown is 500 − (50 × level) ticks. Level 5 lasts 80 ticks, adds 50% damage and has a 250-tick cooldown.
Eternal Resilience
Can activate an effect that absorbs 50% of incoming damage. Duration is 8 × level ticks and cooldown is 500 ÷ level ticks. At Level 5, the effect lasts 40 ticks with a 100-tick cooldown.
Time Manipulator
Can slow the target’s attacks. The listed slowdown scales by 50% per level; cooldown is 200 − (15 × level) ticks, reaching 125 ticks at Level 5.
Jellified
Can turn an incoming damaging hit into healing instead. For example, an incoming hit of 70 would heal 70 if the effect activates. The Level 5 example gives a 1-in-10 activation chance.
Berserker
Guarantees your maximum hit against a target that is at full health. Also adds damage based on your missing Hitpoints: 0.2% × perk level per missing Hitpoint, reaching 1% per missing Hitpoint at Level 5. This is a different perk from Berserker Rage.
Spectral Guardian
Can summon a guardian that heals nearby players. Healing is 5 × perk level, reaching 25 at Level 5.
Enhanced Soak
Provides 1% damage soak per level, reaching 5% at Level 5.
Treasure Hunter
Adds 1% drop rate per level, reaching 5% at Level 5.
Raid Unique Charm
Boosts the chance of a unique raid reward by 5% per level, reaching 25% at Level 5.
Activation-rate note: Some published chance formulas do not agree with their examples. Exact activation rates for Fully Loaded below Level 5, Burning Fury, Elemental Convergence, Soul Reaver, Time Manipulator and Spectral Guardian are therefore not stated here. Confirm these rates in the current game interface or with staff before planning around a specific probability.
4. Recommended perks by slot and item
Use these combinations as a starting point, then prioritise the effects that suit your activity. The list describes recommended choices; it does not establish how many attachments each item can hold.
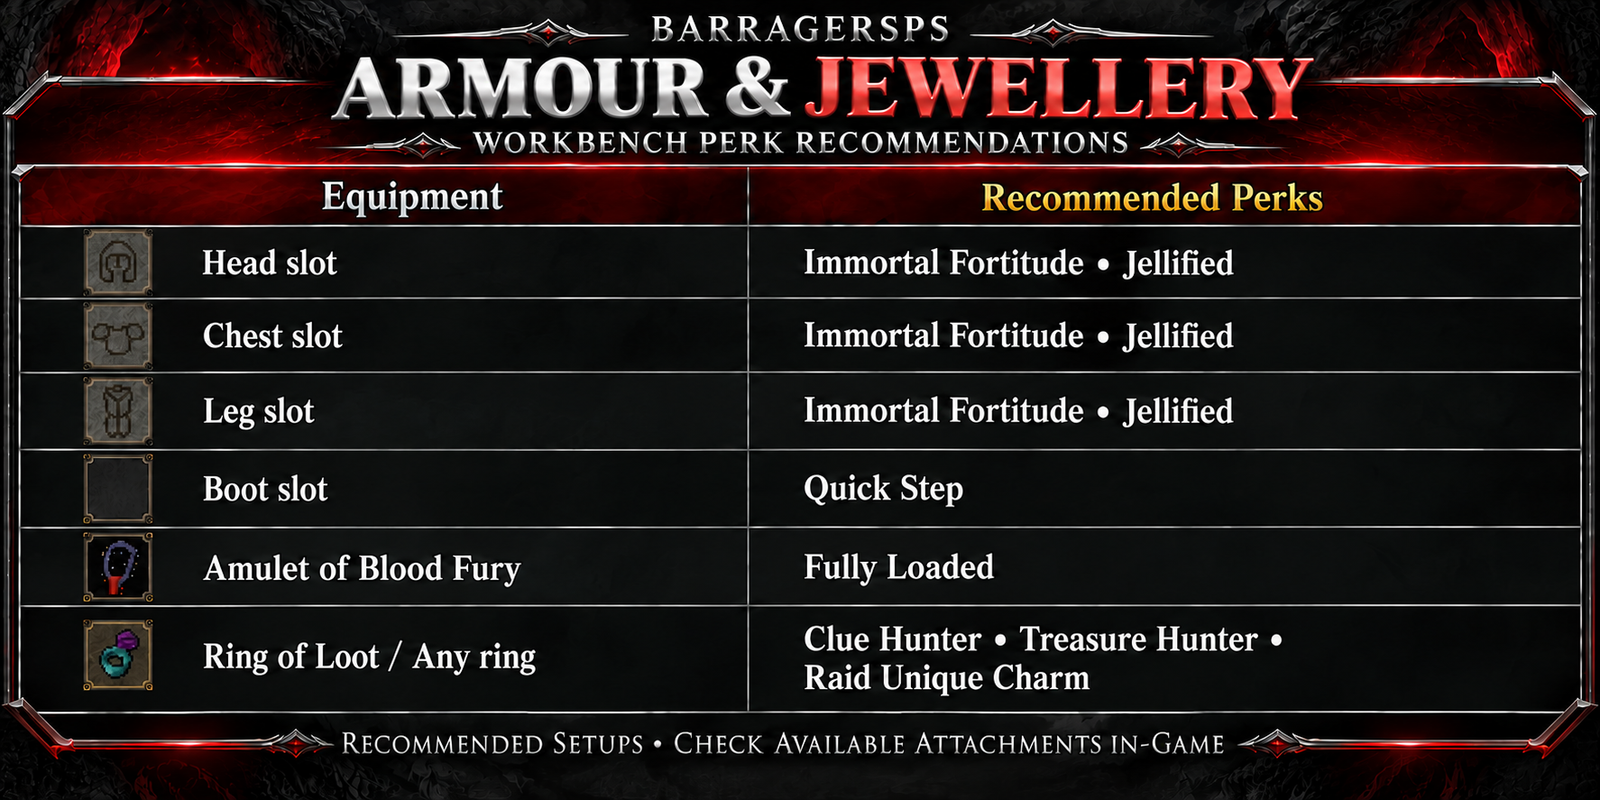
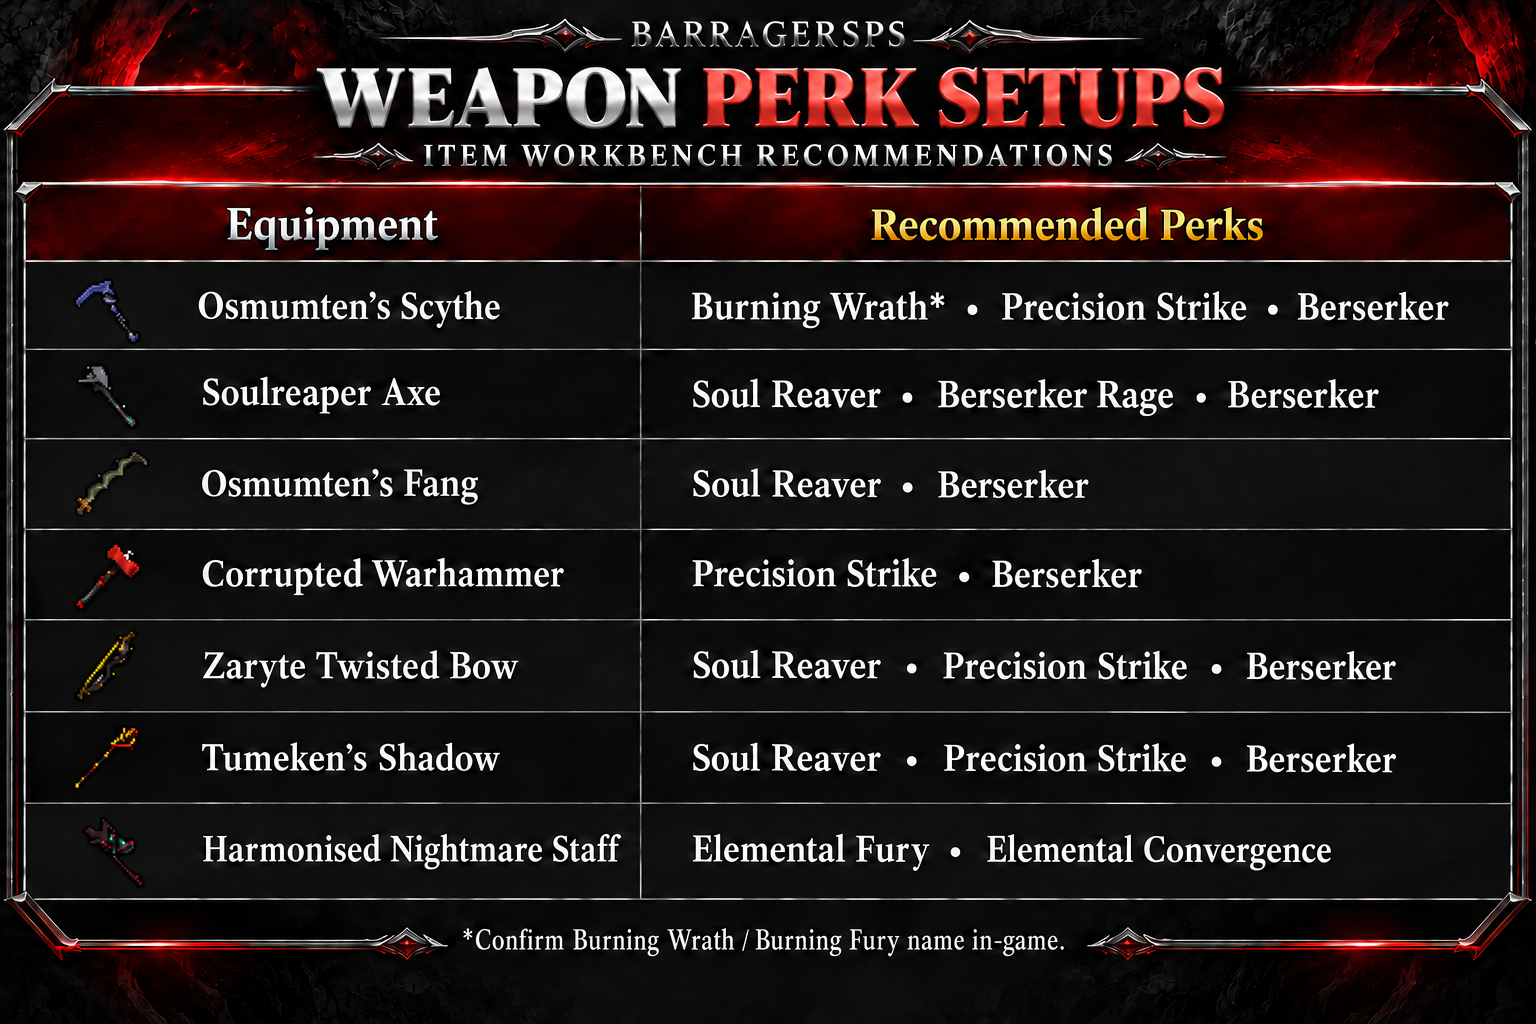 Click either chart to view it at full size.
Name clarification: The recommended Scythe setup lists Burning Wrath, while the burn-effect description is named Burning Fury. Confirm the name and compatibility in-game before choosing it. Jellified may also appear as “Jellyfied” in equipment recommendations; the list above uses Jellified consistently.
5. Planning your upgrades
- Choose the equipment you intend to keep before spending materials on it.
- For survival, compare Immortal Fortitude, Jellified and damage-soak options.
- For damage, match perks to your weapon and spellbook; elemental spell perks specifically apply to Standard Spellbook elemental spells.
- For reward farming, compare Clue Hunter, Treasure Hunter and Raid Unique Charm according to the activity you are doing.
- Check the current ingredient requirement and upgrade odds before committing resources.
Next step: Review your current gear, choose a compatible perk, and check the breakdown-tier list for unwanted items you can convert into materials.
|

|
|
| BarrageRSPS Perks Guide — Complete Level Breakdown |
|
Posted by: barrage bro - 09-30-2026, 08:36 PM - Forum: Misc Guides
- No Replies
|
|
BarrageRSPS Perks Guide
All 51 perks • Levels 1–5
Perks offer specialised bonuses for combat, bossing, resource gathering and skill training. Use this reference to compare each perk across its five levels and choose bonuses that suit your current activity.
Reading the charts- Each column shows the value at that specific level. Do not add the five columns together.
- A plus sign indicates an increase; a minus sign indicates a reduction. A multiplier such as ×2 is different from a percentage bonus.
- For paired or triple values, read the effect description to identify their order.
- An activation chance describes how often an effect can trigger, rather than a guaranteed bonus on every action.
- Select any chart to open the full-size version.
Contents
1. Combat Speed & Magic
2. Accuracy & Special Attacks
3. Healing, Prayer & Food
4. Bosses, Slayer & Loot
5. Skilling & Gathering
6. Crafting & Utility
1. Combat Speed & Magic
Choose these perks when your priority is faster attacks or stronger magic. Match the perk to the style and weapon you actually use: autocast weapon bonuses and magic max-hit bonuses describe different effects.
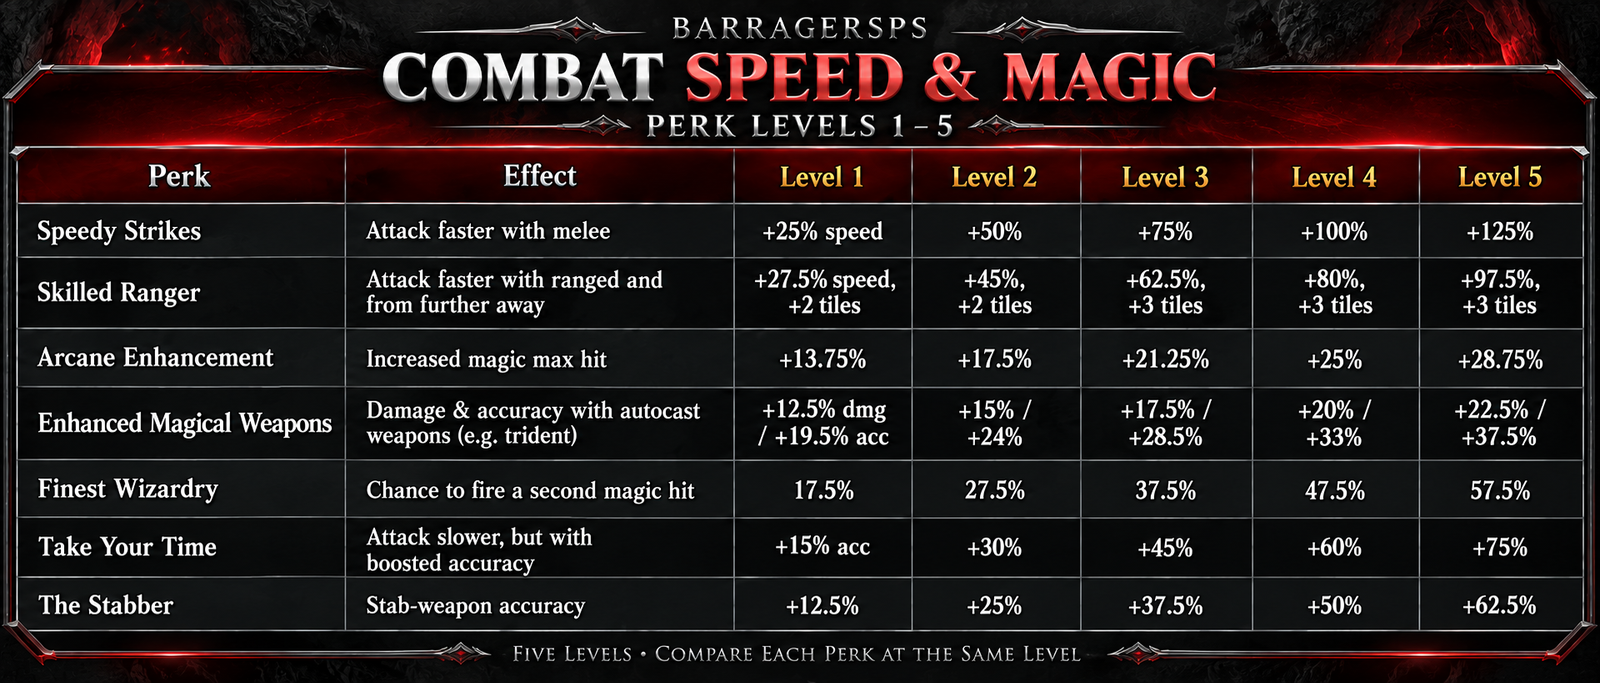 Select the chart to view it at full size.
Perks in this chart: Speedy Strikes • Skilled Ranger • Arcane Enhancement • Enhanced Magical Weapons • Finest Wizardry • Take Your Time • The Stabber.
2. Accuracy & Special Attacks
This group covers slash and crush accuracy, extra ranged shots, bolt activations and special attacks. The Stabber appears in the preceding chart. Recurrent Damage combines an activation chance with a bonus-hit damage ratio.
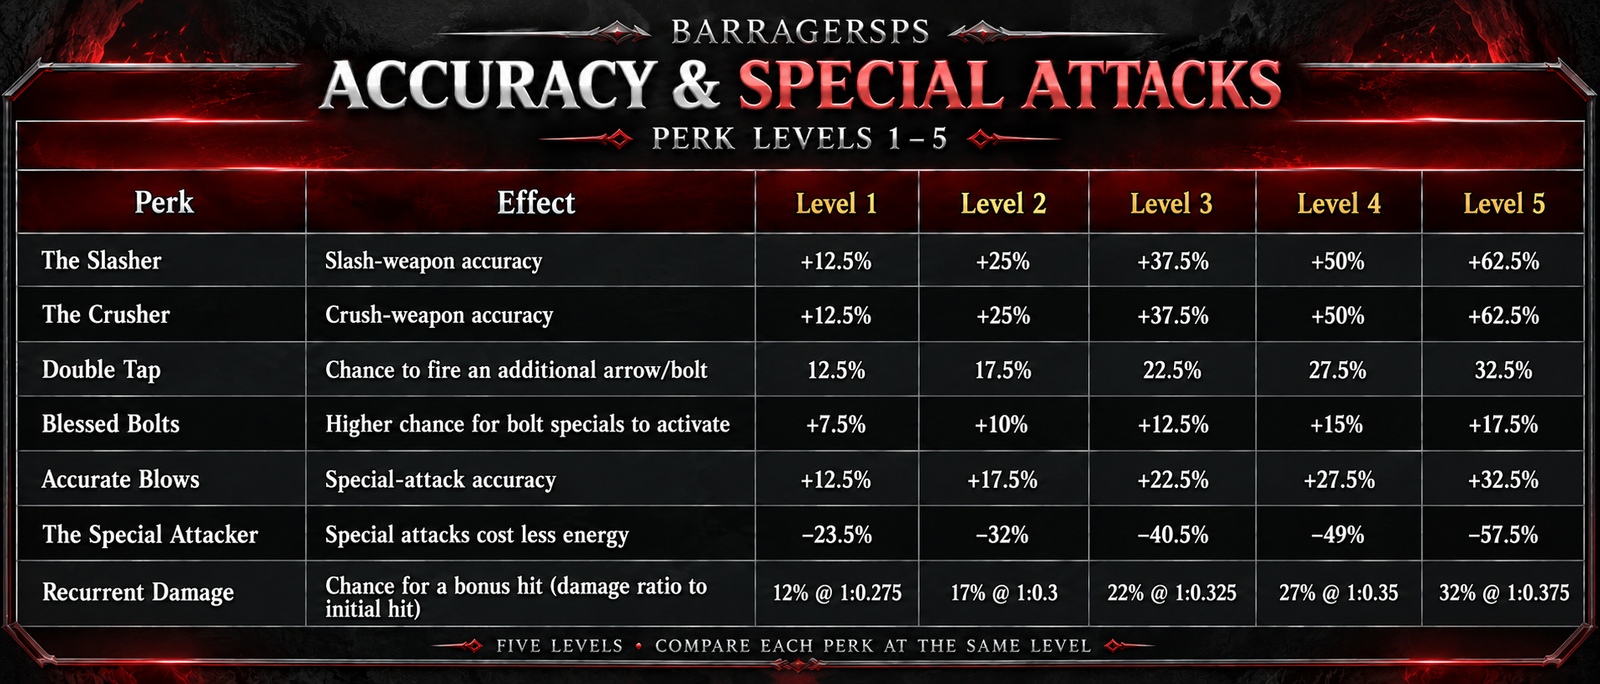 Select the chart to view it at full size.
Perks in this chart: The Slasher • The Crusher • Double Tap • Blessed Bolts • Accurate Blows • The Special Attacker • Recurrent Damage.
3. Healing, Prayer & Food
These perks improve sustain through healing, reduced Prayer drain and more effective food. Damage Reflect lists the activation chance first and the reflected amount second. Food Connoisseur separates the healing increase from the chance to retain food.
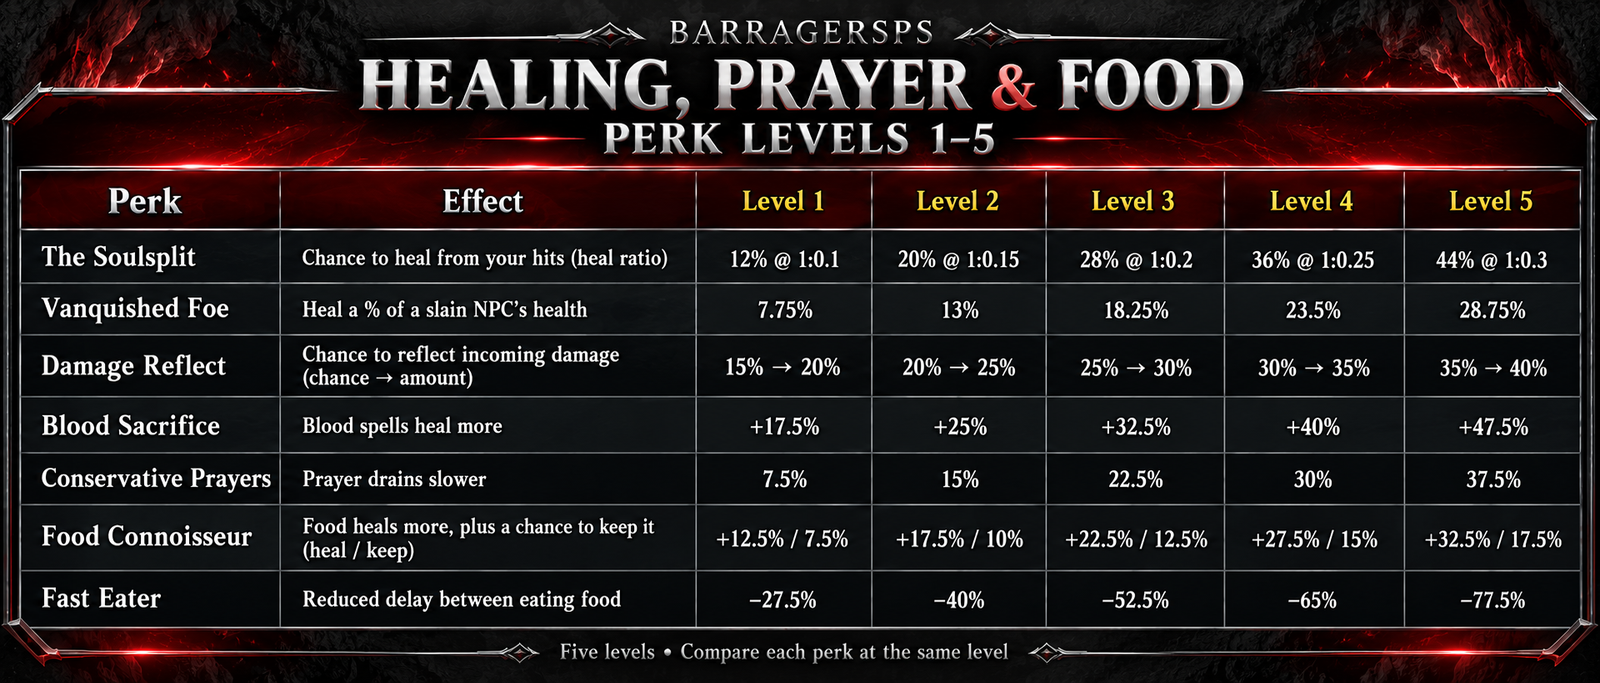 Select the chart to view it at full size.
Perks in this chart: The Soulsplit • Vanquished Foe • Damage Reflect • Blood Sacrifice • Conservative Prayers • Food Connoisseur • Fast Eater.
4. Bosses, Slayer & Loot
Choose an activity-specific perk for the content you intend to repeat. Task bonuses, dragon damage, God Wars, Zulrah, Gauntlet and raid effects each have their own conditions. The final three rows focus on extra loot rolls, coins and pets.
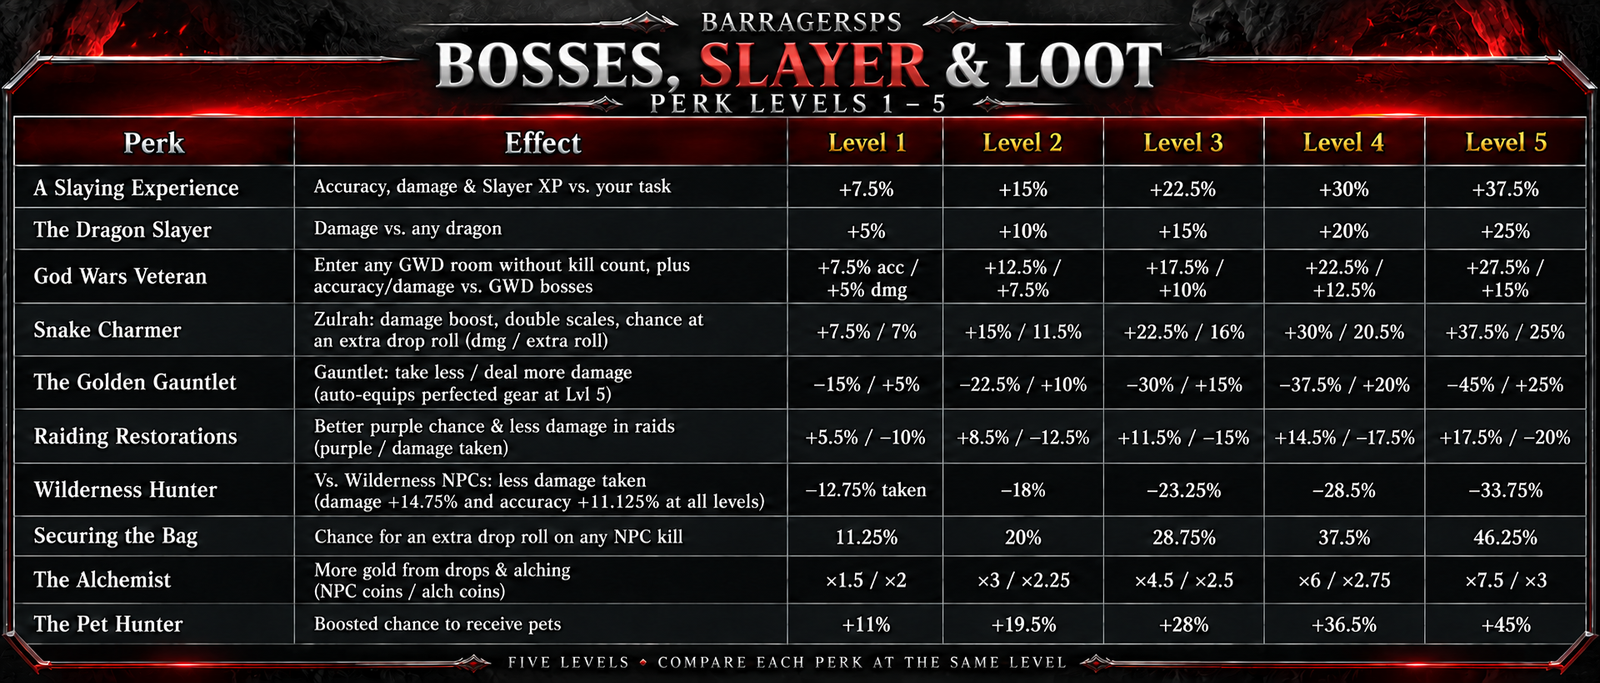 Select the chart to view it at full size.
Perks in this chart: A Slaying Experience • The Dragon Slayer • God Wars Veteran • Snake Charmer • The Golden Gauntlet • Raiding Restorations • Wilderness Hunter • Securing the Bag • The Alchemist • The Pet Hunter.
5. Skilling & Gathering
This chart covers general experience, chinchompas, Hunting, Fishing, Cooking, Firemaking, Woodcutting, Mining and Smithing. Crimson Chin affects chinchompa combat; Taking It On The Chin and Hunting In Its True Form affect Hunter activities.
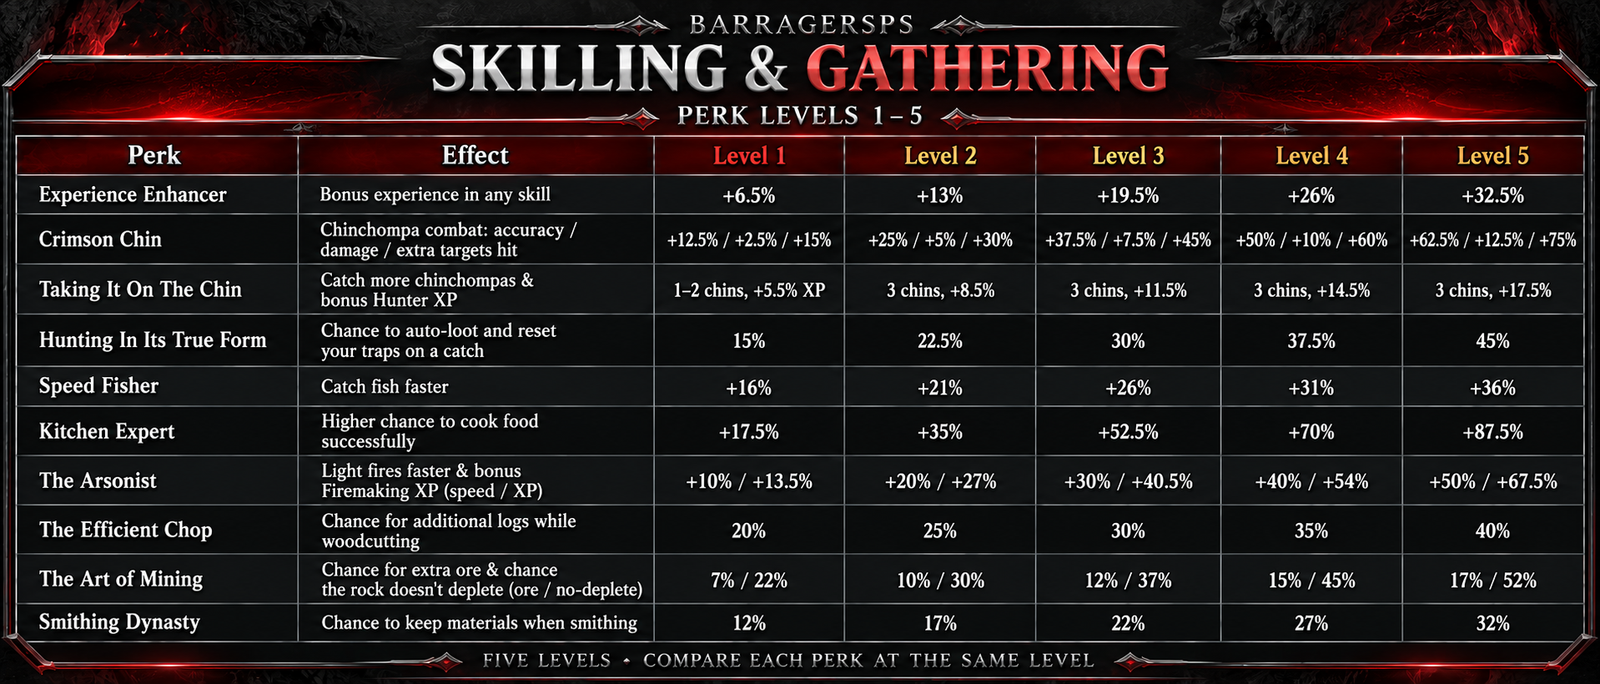 Select the chart to view it at full size.
Perks in this chart: Experience Enhancer • Crimson Chin • Taking It On The Chin • Hunting In Its True Form • Speed Fisher • Kitchen Expert • The Arsonist • The Efficient Chop • The Art of Mining • Smithing Dynasty.
6. Crafting & Utility
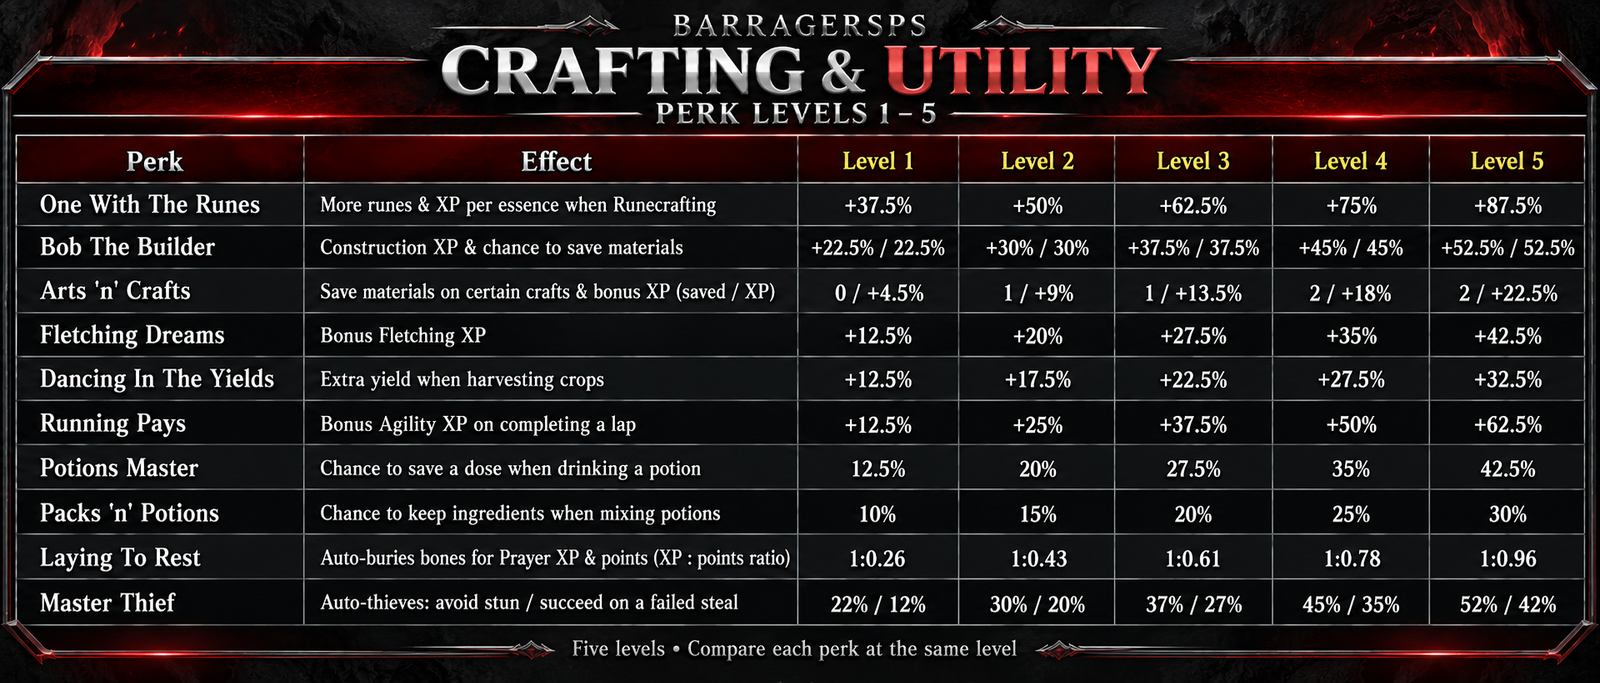
Compare resource savings and experience bonuses for Runecrafting, Construction, Crafting, Fletching, Farming and Agility. Potion, Prayer and Thieving perks round out this group. Paired values follow the order stated in each effect description.
 Select the chart to view it at full size.
Perks in this chart: One With The Runes • Bob The Builder • Arts 'n' Crafts • Fletching Dreams • Dancing In The Yields • Running Pays • Potions Master • Packs 'n' Potions • Laying To Rest • Master Thief.
Details worth checking- God Wars Veteran: Removes the kill-count requirement for God Wars rooms; its accuracy and damage bonuses apply against GWD bosses.
- Snake Charmer: Includes double Zulrah scales. The two level values show the damage bonus and extra-drop-roll chance.
- The Golden Gauntlet: At Level 5, perfected gear is equipped automatically. The paired percentages show reduced damage taken and increased damage dealt.
- Wilderness Hunter: Damage is increased by 14.75% and accuracy by 11.125% at every level against Wilderness NPCs. Only the damage-taken reduction changes across the five columns.
- Recurrent Damage: At Level 5, the listed 32% chance is paired with a 1:0.375 damage ratio: the bonus hit is 37.5% of the initial hit.
- The Soulsplit: At Level 5, the 44% activation chance is paired with a 1:0.3 healing ratio.
- Arts 'n' Crafts: The first number is materials saved on applicable crafts; the second is bonus experience.
Choosing your perks
Start with the activity you plan to spend the most time on. For Slayer, compare task bonuses; for a particular boss, check that boss's dedicated perk. For skill training, decide whether your main goal is faster experience, more resources or fewer materials consumed. Review the relevant level column before deciding which improvement is most useful for your current goal.
Tip: Keep this guide open alongside your perk interface so you can compare names, levels and effects without switching between unrelated charts.
|
|
|
|
| BarrageRSPS Donation Benefits — Ranks & Unlocks |
|
Posted by: barrage bro - 09-30-2026, 07:14 PM - Forum: Misc Guides
- No Replies
|
|
BarrageRSPS Donation Benefits
Compare ranks, unlocks and progression benefits
Donation ranks provide a mix of resource bonuses, combat improvements and convenience features. This guide brings the benefits together so you can compare the ranks against the activities you enjoy.
The eight donation tiers- Regular — $10
- Super — $50
- Elite — $100
- Noble — $250
- Gold — $500
- Platinum — $1,000
- Legend — $2,500
- Supreme — $5,000
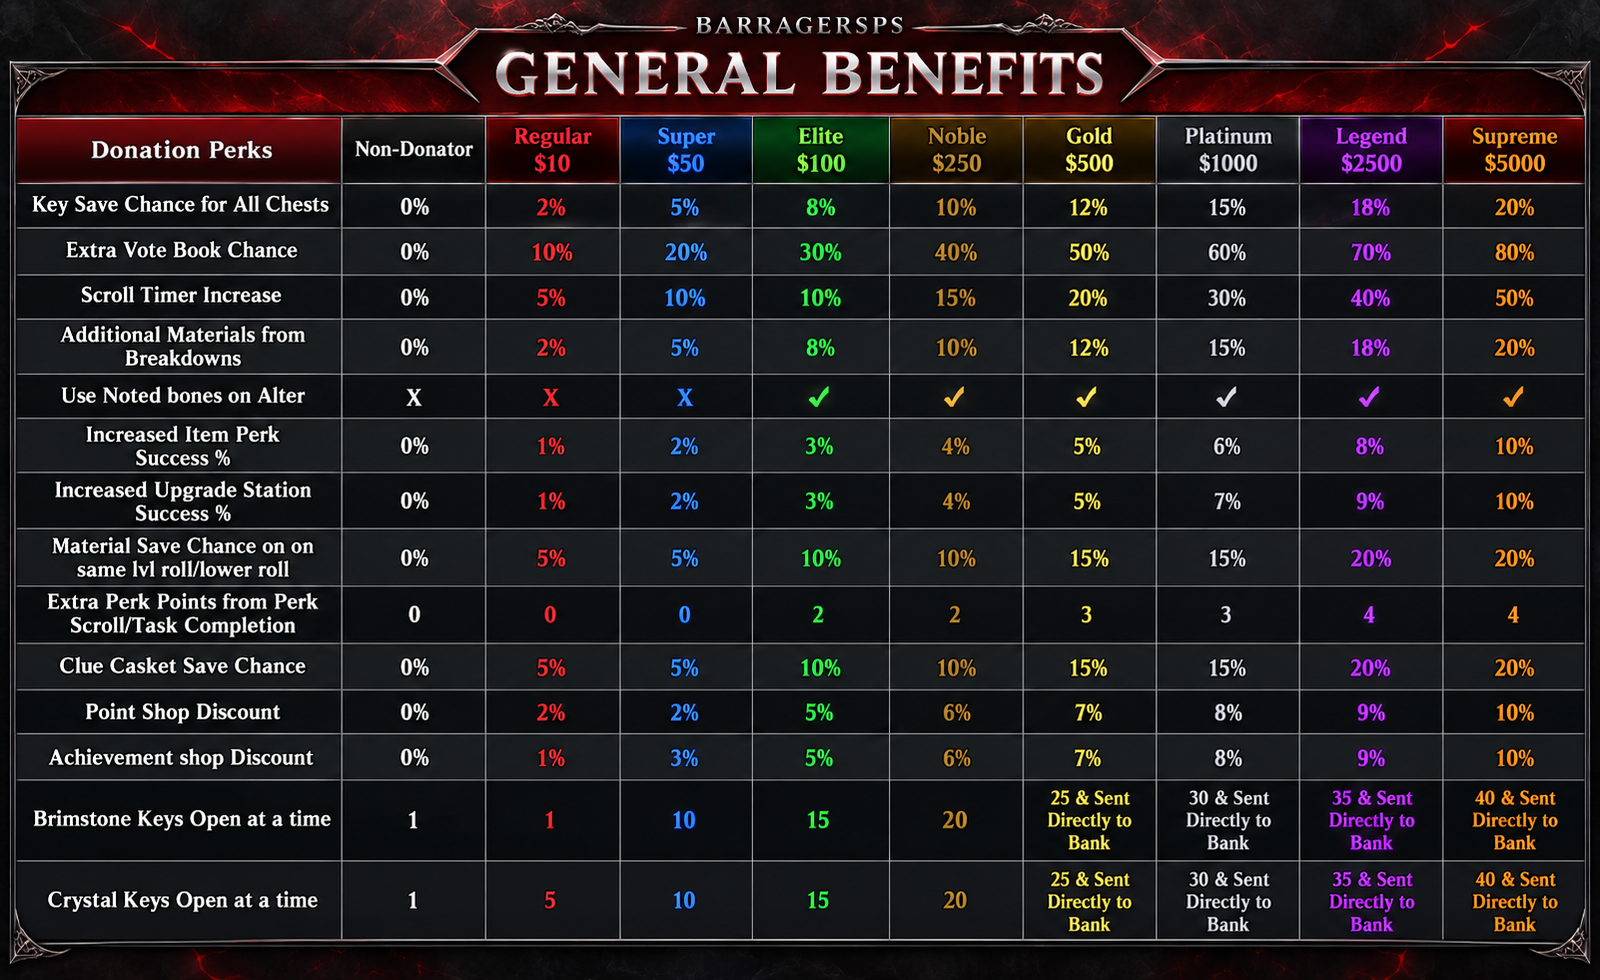
The charts include a Non-Donator column for comparison. Read each row separately: the same rank can offer a percentage bonus in one activity, a capacity increase in another and a feature unlock elsewhere.
1. General benefits
These benefits support everyday progression, perk upgrades, keys and resource management.
- Keys and rewards: chances to save chest keys and clue caskets, plus increased chances for an extra vote book.
- Consumables and resources: longer scroll timers, additional materials from breakdowns and material-saving chances on the listed same-level/lower-roll outcomes.
- Upgrades: increased item-perk and Upgrade Station success chances.
- Perks and shops: additional points from perk scroll/task completion, Point Shop discounts and Achievement Shop discounts.
- Convenience: noted-bone use at the altar and larger batches when opening Brimstone or Crystal keys.
Useful milestones- Elite: noted bones become usable at the altar, and the chart lists 2 extra perk points on completion.
- Gold: both key types can be opened 25 at a time, with the results sent directly to the bank.
- Supreme: 20% chest-key saving, 80% extra vote-book chance, 50% longer scroll timers and 20% extra breakdown materials. Both key types can be opened 40 at a time with banking.
 Select the chart to view it at full size.
2. PvM benefits
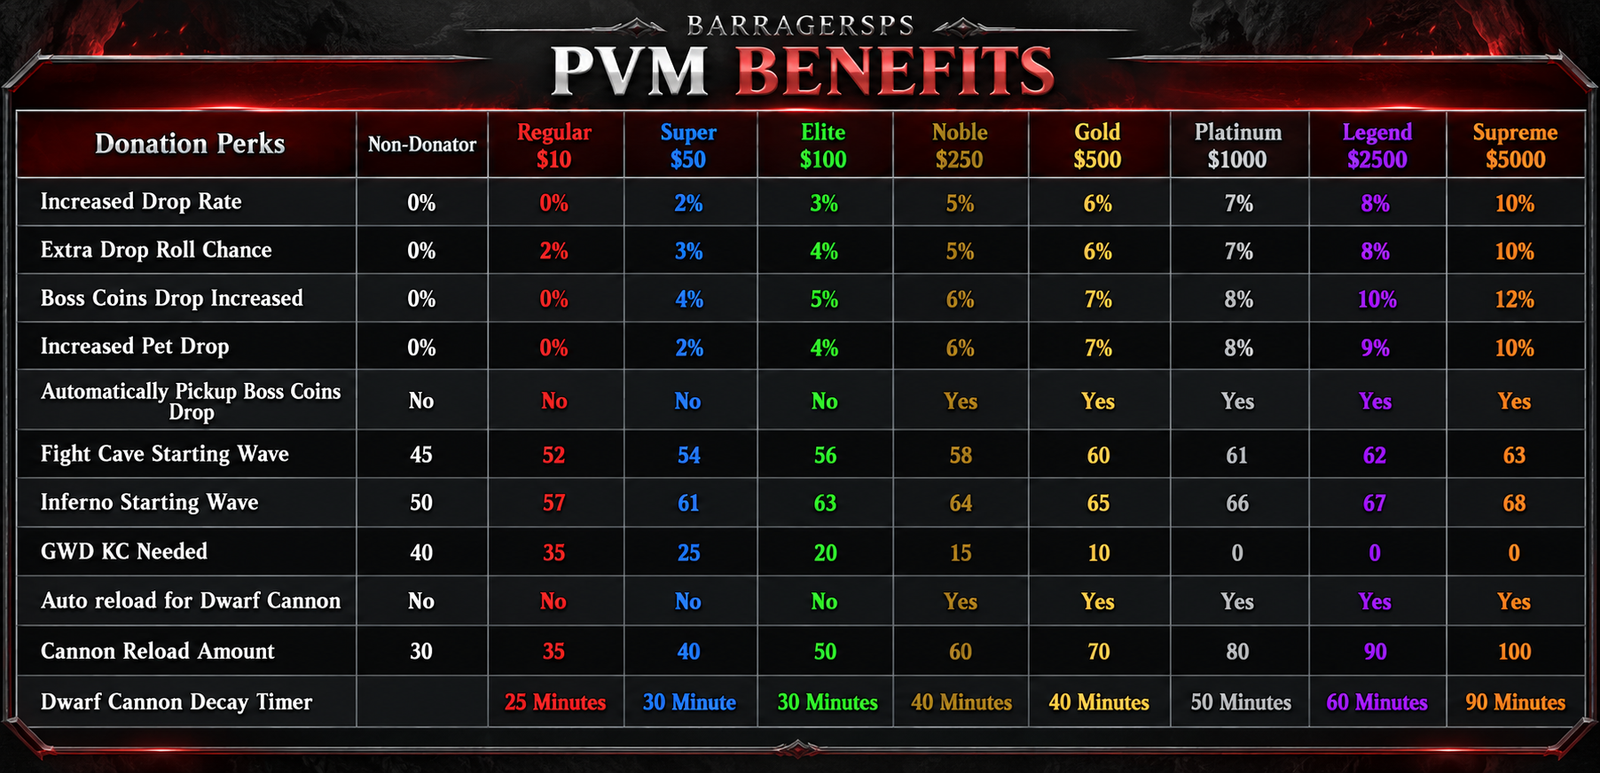
Combat benefits cover drop-related bonuses, boss coins, pets, wave skips and cannon convenience. Increased drop rate and an extra drop-roll chance are separate entries; neither means every kill produces a rare item.
Key unlocks- Super: increased drop rate, boss-coin drops and pet-drop chance begin to appear in the chart. Regular already has a 2% extra drop-roll chance.
- Noble: automatic boss-coin pickup and automatic Dwarf Cannon reloading become available.
- Platinum and above: the listed God Wars Dungeon kill-count requirement is 0.
- Supreme: 10% increased drop rate, 10% extra drop-roll chance, 12% increased boss-coin drops and 10% increased pet-drop chance.
Wave and cannon progression
Higher ranks start later in the Fight Cave and Inferno. Supreme's listed starting waves are 63 and 68 respectively. Cannon reload capacity rises from 30 for Non-Donators to 100 for Supreme, while the listed donator decay timer rises from 25 minutes at Regular to 90 minutes at Supreme. No Non-Donator decay timer is specified in the chart.
 Select the chart to view it at full size.
3. Slayer benefits
Slayer benefits improve superior-spawn chances and provide additional task-related rewards and convenience.
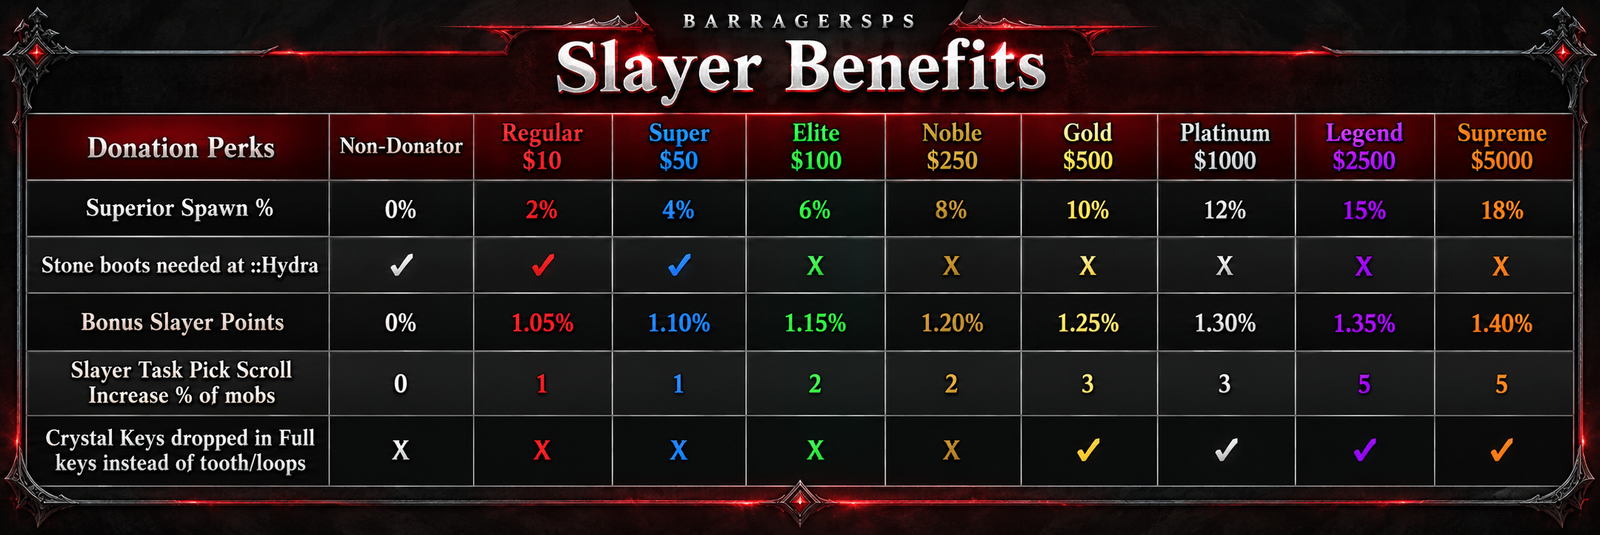
- Superior spawn chance: the listed bonus increases from 2% at Regular to 18% at Supreme.
- Hydra equipment requirement: Elite and higher ranks do not need stone boots for the listed ::Hydra requirement.
- Full Crystal keys: Gold and higher ranks receive full keys instead of tooth/loop halves for the listed benefit.
- Task Pick Scroll: the chart's displayed increase rises through 1, 2, 3 and 5 according to rank.
The Bonus Slayer Points row is reproduced exactly as supplied: 1.05% at Regular through 1.40% at Supreme. These displayed percentages are not presented here as experience or points multipliers.
 Select the chart to view it at full size.
4. Skilling benefits
Skilling ranks offer larger storage capacities, resource bonuses and reduced service costs. Compare the rows most relevant to your training method.
- Storage: larger coal bags, gem bags and herb sacks reduce how often you need to bank.
- Supplies: improved crop yields, additional stardust from ::star and a chance to receive skilling resources as noted items.
- Services: reduced potion-decant costs at Zahur.
- Agility: boosted Marks of Grace as shown in the chart.
- Smelting: Noble and higher ranks can use noted coal for the listed benefit.
Supreme comparison
The listed capacities are 550 coal, 300 gems and 150 herbs. Supreme also has an 18% Zahur decant-cost reduction, 12% increased crop yield, 20% additional stardust, a 35% chance for noted skilling resources and a displayed Marks of Grace boost of 8.
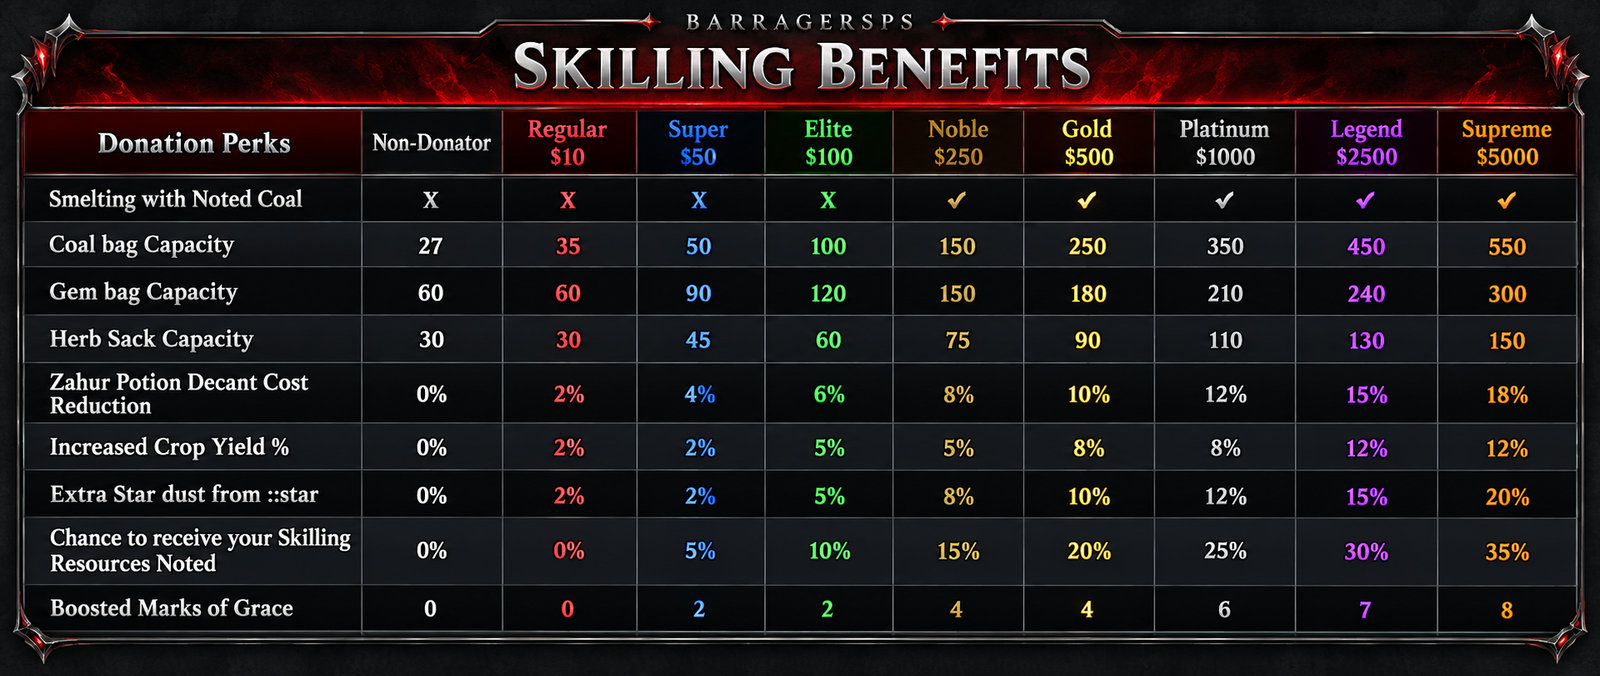 Select the chart to view it at full size.
5. ::DZD private instances
The private-instance chart identifies specific rank milestones for Vyrewatch, clue activities and the Catacombs of Kourend.
- Super: first Vyrewatch instance.
- Elite: first Easy Clue instance and first Catacombs of Kourend instance.
- Noble: second Vyrewatch instance.
- Gold: second Easy Clue instance, first Hard Clue instance and second Catacombs of Kourend instance.
- Legend: second Hard Clue instance and third Catacombs of Kourend instance.
No Medium Clue instance is marked as available in this chart. The table identifies the displayed unlock entries; it does not explain access inheritance between ranks. Check the current ::DZD interface or ask staff if you need to confirm which numbered instances your rank can enter.
 Select the chart to view it at full size.
Find the benefits that matter to you
For combat, compare drop-related rows, wave starts and cannon features. For Slayer, focus on superior spawns and task rewards. For skilling, compare storage capacity and resource bonuses. General benefits are useful across several activities, particularly when opening keys, upgrading equipment or building perks.
Thank you for supporting BarrageRSPS!
For questions about your rank or a specific benefit, contact staff through the Support section.
|
|
|
|
| BarrageRSPS Item Breakdown Tiers — Complete Reference |
|
Posted by: barrage bro - 09-30-2026, 06:47 PM - Forum: Misc Guides
- No Replies
|
|
BarrageRSPS Item Breakdown Tiers
A practical reference for the Item Disintegrator
Item breakdown converts eligible equipment and other items into minerals and enhancers. This guide explains how to read the preview, compares the supplied tier examples and provides searchable item lists for planning your resources.
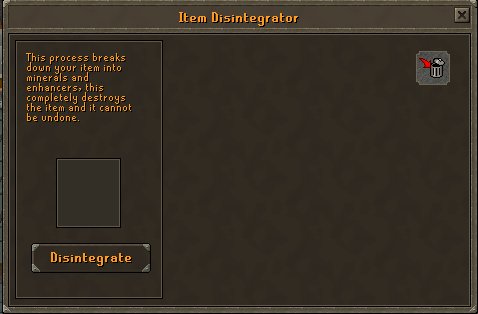
Before you disintegrate: the selected item is completely destroyed. The process cannot be undone.
Use the preview to make your decision
- Place the exact item you want to check in the Item Disintegrator.
- Confirm the tier displayed beneath the item.
- Read the potential quantity range and chance for each output slot.
- Compare the possible materials with the item's usefulness, trading value and replacement cost.
- Only select Disintegrate when you are comfortable losing that item permanently.
Reading the output slots
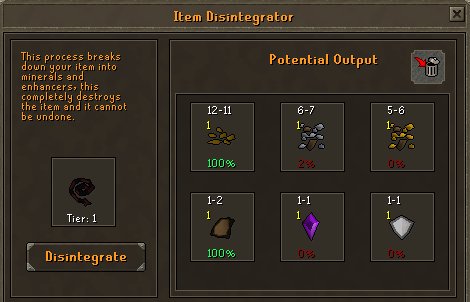
A 100% chance indicates a guaranteed output for that slot in the displayed preview; it does not guarantee the maximum quantity. A chance below 100% means you may receive none of that output. A 0% slot will not award its pictured resource for that breakdown.
Finding an item: Press Ctrl + F on a computer, or use your browser's Find in page function on mobile. Search by the item's name, then read its tier heading.
These are reference entries and example screenshots. The live Item Disintegrator is authoritative for Barrage's current tier, quantities and chances. Item variants and later updates can change the result.
Tier-by-tier reference
The item lists below are grouped by tier and by where the item is obtained. An item appearing in a list does not mean it is a good item to sacrifice: keep equipment you still need and consider alternatives first.
Tier 1
An entry-level breakdown preview. The pictured example guarantees the top-left and bottom-left resources; other output slots can have low or zero chances.
PvM drops- Abyssal Whip; All Ahrims; All Dharoks; All Guthans
- All Karils; All Torags; All Veracs; Amulet of Avarice
- Ancient Icon; Armadyl Helmet; Ballista Limbs; Ballista Spring
- Bandos Boots; Black Mask; Blessed Spirit Shield; Craws Bow
- Dragon Axe; Dragon Defender; Dragon Harpoon; Dragon Pickaxe
- Dragonbone Necklace; Drakes Claw; Drakes Tooth; Elder Chaos Hood
- Elder Chaos Robe; Elder Chaos Top; Eternal Crystal; Fedora
- Fire Cape; Heavy frame; Infernal Axe; Infernal Pickaxe
- Jar of Souls; Kraken Tentacle; Light Frame; Magic Fang
- Malediction Ward; Monkey Tail; Mud Battlestaff; Occult Necklace
- Odium Ward; Pegasian Crystal; Primordial Crystal; Ring of the Gods
- Saradomin Sword; Saradomins Light; Serpentine Helm; Serpentine Visage
- Smoke Battlestaff; Smouldering stone; Spirit Shield; Staff of the Dead
- Thammarons Sceptre; Treasonous Ring; Trident of the seas; Tyrannical Ring
- Uncut Onyx; Unsired; Venator Shard; Viggoras Chainmace
- Vorkaths Head
Tier 2
The pictured tier introduces chances for both enhancer slots. A possible reward is not guaranteed simply because it is visible.
PvM drops- Abyssal Bludgeon; Abyssal Dagger; Abyssal Tentacle; Ancient Wyvern Shield
- Archers Ring; Archers Ring (I); Armadyl Chainskirt; Armadyl Chestplate
- Armadyl Godsword; Armadyl hilt; Bandos Chestplate; Bandos Godsword
- Bandos hilt; Bandos Tassets; Berserker Ring; Berserker Ring (I)
- Brimstone Ring; Callisto Claws; Chromium Ingot; Core Spirit
- Crystal Body; Crystal Helm; Crystal Legs; Devout Boots
- Draconic Visage; Dragon Crossbow; Dragon platebody; Dragonfire Shield
- Dragonfire Ward; Eternal Boots; Executioners Axe Head; Eye of the Duke
- Hydra Tail; Infernal Cape; Jar of Chemicals; Jar of Darkness
- Jar of Decay; Jar of Dirt; Jar of Eyes; Jar of Miasma
- Jar of Sand; Jar of Swamp; Leviathans Lure; Morrigan Coif
- Morrigans Leather Body; Morrigans Leather Chaps; Nightmare Staff; Primordial Boots
- Sarachnis Cudgel; Saradomin Godsword; Saradomin hilt; Seers Ring
- Seers Ring (I); Sirens Staff; Skeletal Visage; Skull of Vetion
- Statius Full Helm; Statius Platebody; Statius Platelegs; Tome of Fire
- Tome of Water; Toxic Blowpipe; Toxic staff; Toxic Staff of the Dead
- Treasonous Ring (I); Trident of the Swamp; Venenatis Fangs; Vestas Chainbody
- Vestas Longsword; Vestas Plateskirt; Vestas Spear; Warrior Ring
- Warrior Ring (I); Wyvern Visage; Zamorakian Hasta; Zamorakian Spear
- Zuriels Hood; Zuriels Robe Bottom; Zuriels Robe Top; Zuriels Staff
Clue rewards- Ale of the Gods; Holy Sandals; Obsidian Cape ®; Ranger boots
- Spiked Manacles; Wizard Boots
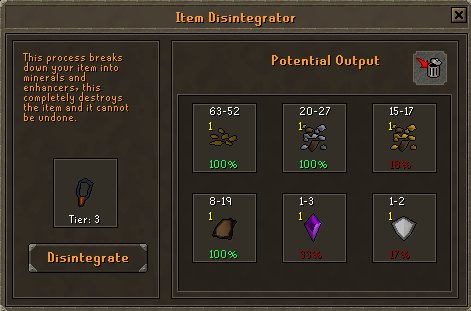
Tier 3
In this preview, the top-left, top-middle and bottom-left resources have 100% chances. The other three rewards remain chance-based.
PvM drops- Accursed Sceptre; Amulet of Torture; Ancient Godsword Hilt; Argentavis Feather
- Armadyl Crossbow; Bellator Vestige; Corrupted Symbiosis; Demonic Blood
- Demonic String; Eldritch Orb; Galvek Eye; Heavy Ballista
- Light Ballista; Lightbearer; Magma Helm; Magma Mutagen
- Magus Vestige; Necklace of Anguish; Pegasian Boots; Ring of Suffering
- Ring of Suffering (I); Tanzanite Helm; Tanzanite Mutagen; Tormented Bracelet
- Ultor Vestige; Ursin Chainmace; Venator Vestige; Volatile Orb
- Webweaver Bow; Zenyte Jewelry (All); Zenyte Shard
Clue rewards- Ankou Gloves; Ankou Leggings; Ankou Mask; Ankou Socks
- Ankou Top; Bucket Helm G; Gilded 2h Sword; Gilded Axe
- Gilded Boots; Gilded Chainbody; Gilded Coif; Gilded Dhide Body
- Gilded Dhide Chaps; Gilded Dhide Vambs; Gilded Full Helm; Gilded Hasta
- Gilded Kiteshield; Gilded Med Helm; Gilded Pickaxe; Gilded Platebody
- Gilded Platelegs; Gilded Plateskirt; Gilded Scimitar; Gilded Spade
- Gilded Spear; Gilded Square Shield; Mummy Body; Mummy Feet
- Mummy Hands; Mummy Head; Mummy Legs
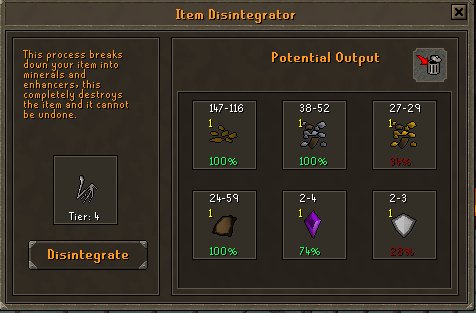
Tier 4
The illustrated chances for the top-right, bottom-middle and bottom-right rewards are 34%, 74% and 28% respectively.
PvM drops- Ancient Godsword; Arcane Prayer Scroll; Arcane Sigil; Arcane Spirit Shield
- Avernic Defender Hilt; Big Wing; Dexterous Prayer Scroll; Dinh's Bulwark
- Dragon Claws; Dragon Hunter Crossbow; Dragon Warhammer; Elder Maul
- Eldritch Nightmare Staff; Imbued Heart (Range) (Mage) (Melee); Justiciar Chestguard; Justiciar Faceguard
- Justiciar Legguards; Kodai Insignia; Merlins Cloak; Nylocas Fangs
- Osmumten's Fang; Ring of AOE; Ring of Loot; Spectral Sigil
- Spectral Spirit Shield; Superior Potion; Twisted Buckler; Virtus Mask
- Virtus Robe Bottoms; Virtus Robe Top; Volatile Nightmare Staff; Zaryte Vambraces
Tier 5
The purple enhancer slot reaches 100% in this preview. The top-right resource and white enhancer remain chance-based at 65% and 45%.
PvM drops- Ancestral Hat; Ancestral Robe Bottom; Ancestral Robe Top; Avernic Defender
- Bellator Ring; Broken Torva Full helm; Broken Torva platebody; Broken Torva platelegs
- Corrupted Warhammer; Demonic Amulet; Demonic Bracelet; Dragon Hunter Lance
- Dragon Hunter staff; Elidinis Ward; Harmonised Orb; Hydra Leather
- Inquisitors Greathelm; Inquisitors Hauberk; Inquisitors Mace; Inquisitors Plateskirt
- Kodai Wand; Magus Ring; Masori Body; Masori Chaps
- Masori Mask; Nihil Horn; Sunfire fanatic chausses; Sunfire fanatic cuirass
- Sunfire fanatic helm; Ultor Ring; Venator Bow; Venator Ring
Clue rewards- 3rd Age Amulet; 3rd Age Cloak; 3rd Age Druidic Cloak; 3rd Age Druidic Robe Bottoms
- 3rd Age Druidic Robe Top; 3rd Age Druidic Staff; 3rd Age Full Helmet; 3rd Age Kiteshield
- 3rd Age Mage Hat; 3rd Age Platebody; 3rd Age Platelegs; 3rd Age Plateskirt
- 3rd Age Range Coif; 3rd Age Range Legs; 3rd Age Range Top; 3rd Age Range Vambraces
- 3rd Age Robe; 3rd Age Robe Top; Ring of 3rd Age
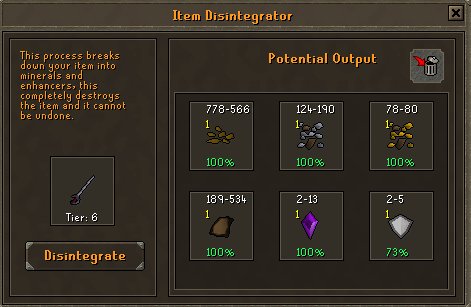
Tier 6
Five output slots show 100% in the pictured preview. The white enhancer slot remains chance-based at 73%.
PvM drops- Divine Sigil; Divine Spirit Shield; Elidinis Ward F; Elysian Sigil
- Elysian Spirit Shield; Ghrazi Rapier; Imbued Heart Overload; Masori Body F
- Masori Chaps F; Masori Mask F; Ophidian Body; Ophidian Chaps
- Ophidian Mask; Sanguinesti Staff; Snake Tail; Torva Full helm
- Torva platebody; Torva platelegs; Zaryte Crossbow
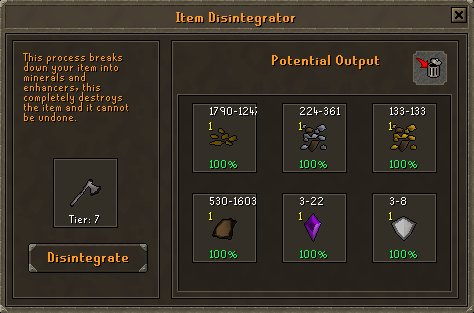
Tier 7
All six slots show 100% in the example. Quantity ranges still vary, so a guaranteed reward does not mean a fixed amount.
Clue rewards- 3rd Age Axe; 3rd Age Bow; 3rd Age Longsword; 3rd Age Pickaxe
- 3rd Age Wand
Rare items- Black H'ween Mask; Black Santa Hat; Blue H'ween Mask; Green H'ween Mask
- Red H'ween Mask; Santa Hat
No separate PvM item list is provided for Tier 7 in this reference; the listed clue rewards and rare items still belong under this tier.
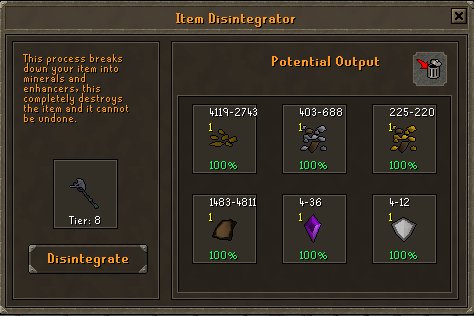
Tier 8
All six slots show 100%, with larger illustrated quantity ranges. Check the preview for the exact item you intend to break down.
PvM drops- Holy Scythe of Vitur; Sanguine Scythe; Scythe of Vitur; Soulreaper Axe
- Superior Heart; Tumekens Shadow; Twisted Bow
Rare items- Black Partyhat; Blue Partyhat; Green Partyhat; P'hat and Specs
- Purple Partyhat; Rainbow Partyhat; Red Partyhat; White Partyhat
- Yellow Partyhat
Tier 10
The highest tier illustrated here. All six slots show 100%, with substantial potential quantities. Compare the value of the original item with the resources before committing.
PvM drops- Osmumten's Scythe; Twisted Zaryte Bow
- Before-you-break-down checklist
- Correct item and variant selected.
- Current tier and every reward slot checked.
- Guaranteed outputs distinguished from chance-based rewards.
- Equipment needs, trade value and replacement cost considered.
- Permanent loss of the selected item understood.
Plan your upgrades, protect the items you need, and make each breakdown count.
|
|
|
|
| BarrageRSPS Starter Guide — Your First Steps |
|
Posted by: barrage bro - 09-30-2026, 05:28 PM - Forum: Misc Guides
- No Replies
|
|
BarrageRSPS Starter Guide
Choose your account. Build your perks. Start your adventure.
Welcome to BarrageRSPS! This guide takes you through your first account choices, useful starter items, daily rewards and a practical route towards stronger equipment. You do not need to rush into bosses: a few early decisions will make the rest of your journey much smoother.
Quick start
- Choose an account type that suits how you want to play.
- Select a difficulty based on your preferred training speed.
- Check your starter inventory and newcomer tasks.
- Visit the Perk Master and begin a manageable task.
- Vote, claim your rewards and keep your daily streak going.
- Improve your equipment gradually, then explore bosses and collection logs.
The current in-game interfaces are the reference for requirements, reward values and available features. Some screenshots retain older server wording.
1. Decide how you want to play
Account type determines how you obtain and share resources. Difficulty is a separate choice that controls the pace of progression.
Regular account
Choose a regular account if you want access to trading and the player economy. It offers the most flexibility when buying supplies, upgrading gear and playing with friends.
Standard Ironman
A self-sufficient account: obtain your own equipment and supplies without trading with other players. This is a good choice if you enjoy earning each upgrade yourself.
Ultimate Ironman
Adds the challenge of playing without normal banking. Inventory planning becomes part of almost every activity, so this mode is best suited to players who already understand Ironman progression.
Hardcore Ironman
Follows Ironman restrictions with an additional survival challenge. An unsafe death can remove your Hardcore status and leave you as a regular Ironman. Before attempting unfamiliar content, check its death rules with staff.
Group Ironman
Progress as a team of up to five players. Share resources within your group and divide responsibilities such as gathering supplies, skilling and preparing for PvM.
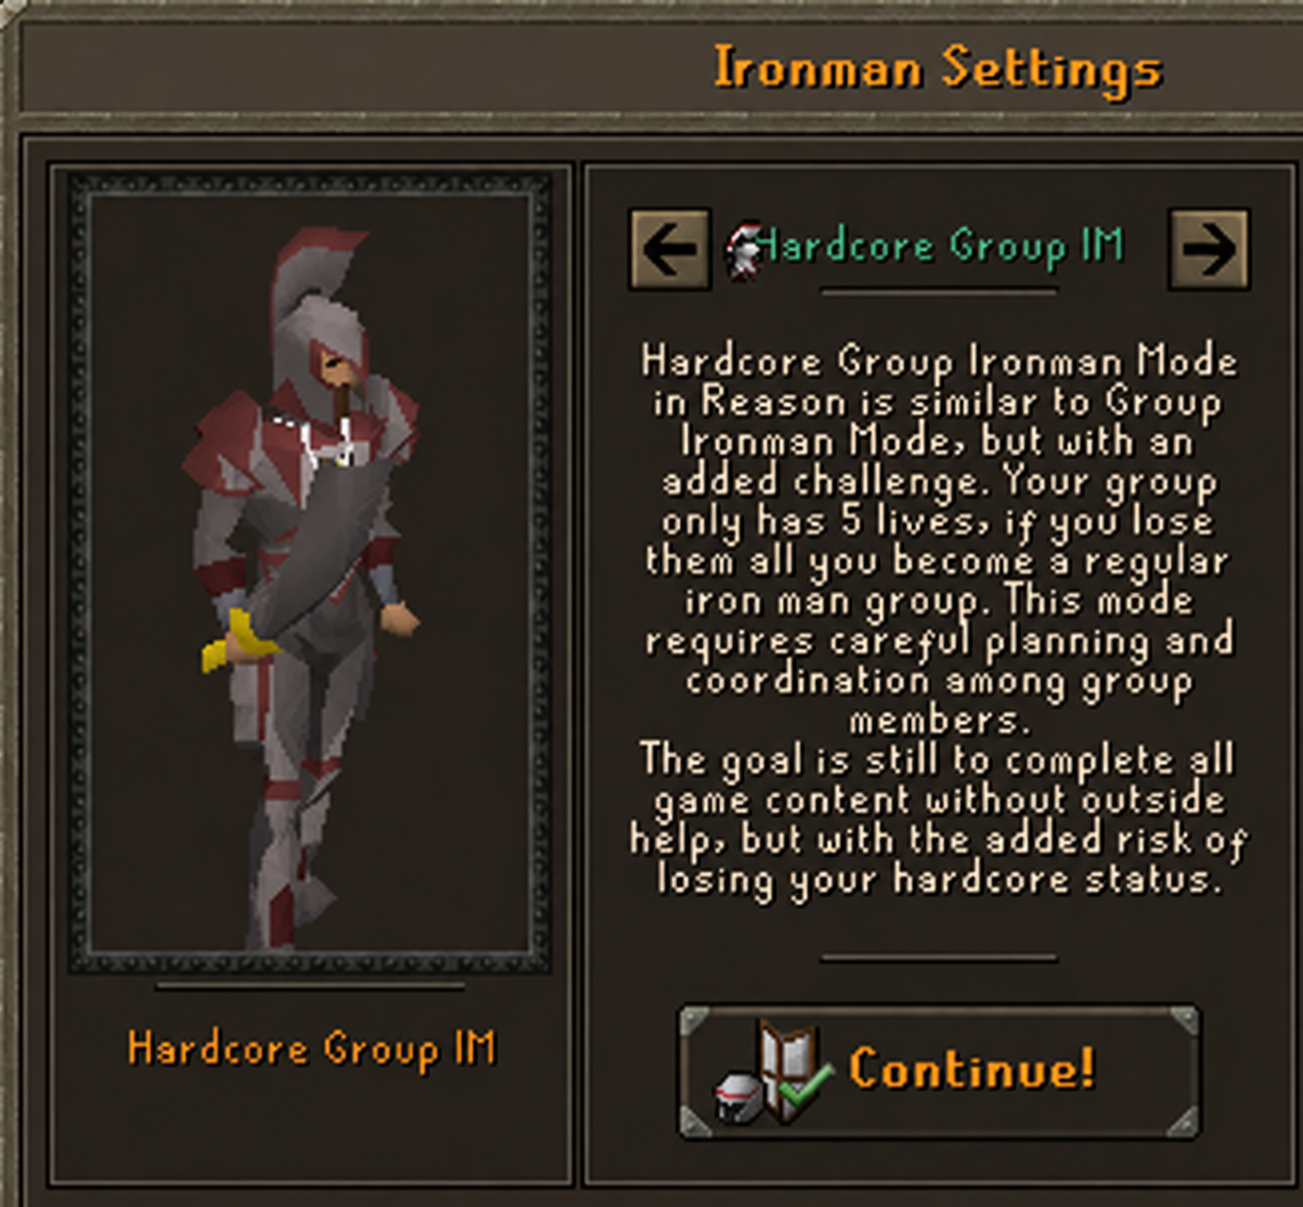
Hardcore Group Ironman
Combines group progression with a shared survival challenge. The account screen shows five group lives; coordinate carefully and confirm the death rules before entering risky activities.
Choosing your mode: Regular accounts offer freedom, Ironman rewards independence, and Group Ironman suits a coordinated team. Hardcore and Ultimate modes add challenges that are easier to manage with prior experience.
2. Choose your training pace
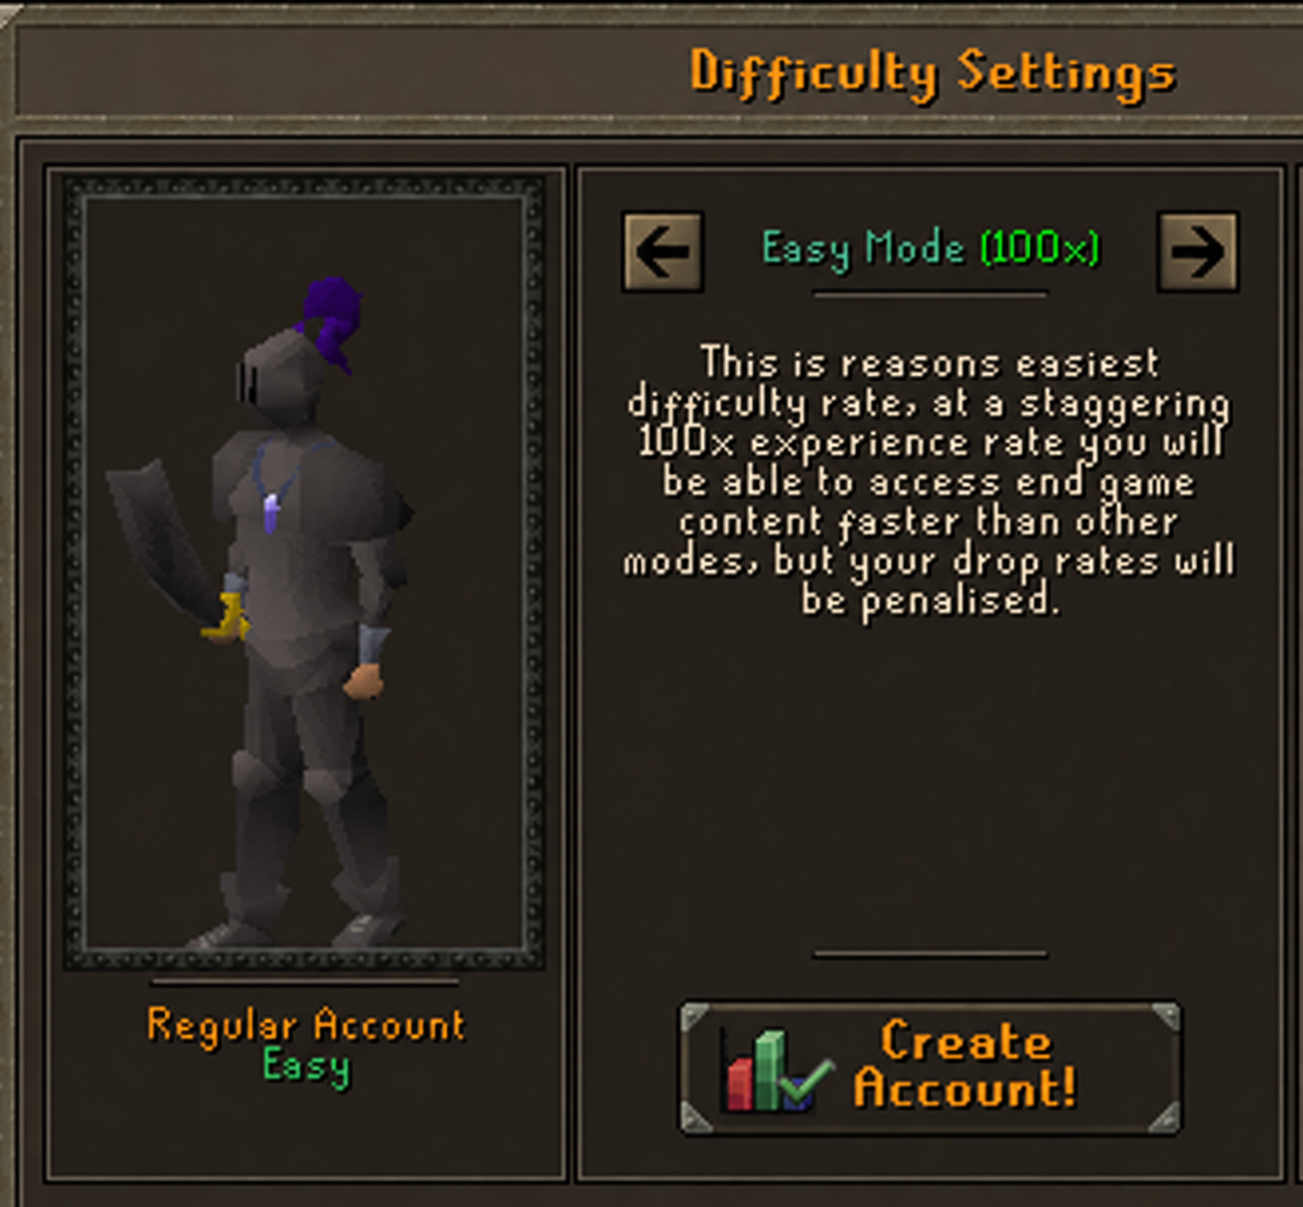
A higher experience multiplier means faster levelling. Slower modes trade that convenience for stronger progression incentives. Read the selection screen before confirming your choice.
Easy — 100x experience
The fastest route through early training. A practical option if your priority is reaching activities quickly and learning the server.
Intermediate — 25x experience
A middle ground between quick training and a longer progression journey. Its account screen describes improved drop rates and additional points compared with Easy.
Hard — 10x experience
Slower training with further incentives. The selection screen also lists access to the training amulet.
Extreme — 3x experience
The slowest training option, aimed at players who enjoy a longer grind. Its selection screen lists stronger drop-rate incentives and access to the training amulet, sword, staff and bow.
Before changing difficulty: Ask about the current reset rules and any limit on changes. A mode change can affect your levels, so plan before investing time in training.
3. Make use of your starter inventory
Before leaving home, inspect each starter item rather than banking everything immediately. Your initial supplies and utility items are designed to help you establish a routine.
- Perk claim ticket: Check the Perk Shop for the free perk upgrade available through your ticket. Pick a perk that supports the activities you plan to do first.
- Perk crystal: Use it to keep track of your current task and active perks.
- Training amulet: Check its available equipment upgrades as your combat levels increase.
- Achievement book: Browse achievable goals and their rewards to give your early training a purpose.
- Newcomer task book: Complete the introductory objectives alongside your normal progression. Review the final reward before setting the book aside.
- Training weapons: If your mode provides them, use them for early combat and watch their remaining charges.
A sensible first session: Organise your supplies, read the newcomer objectives, train the levels you need for basic equipment, then start a task you can complete comfortably.
4. Build a daily reward routine
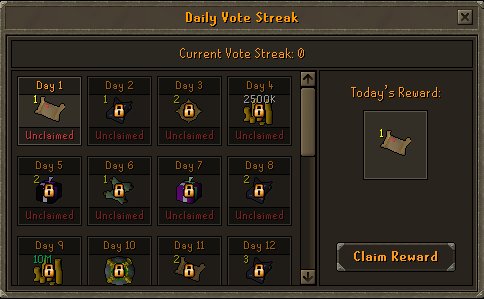
Voting is a useful habit to establish early. Use ::vote to open the voting page, complete the available votes, then return to the game and use ::voted to claim eligible rewards.
Visit the Vote Handler
Check the Vote Handler's shop to see what your points can purchase. Compare useful supplies and progression rewards before spending your first points.
Keep your streak active
Open ::votestreak to review your progress and available daily rewards. Claim eligible rewards and check the requirements for your next milestone.
Tip: Make voting and checking your task books part of your login routine. Small, consistent rewards are easier to maintain than trying to catch up later.
5. Use perks to support your goals
The Perk Master provides access to perk tasks and the exchange/shop interface. Start with tasks that match your current gear and skill levels, then upgrade the perks you use most often.
Combat-focused start
If you plan to train ranged and move into PvM, Skilled Ranger is a useful first option to inspect for your starter ticket. Afterwards, consider sustain, attack speed and Slayer-related perks alongside damage upgrades. Read each tooltip before spending points.
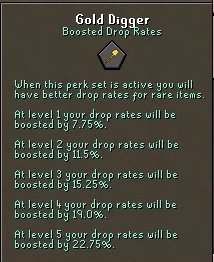
Gold Digger — drops
The illustrated perk boosts drop rates while active. Its tooltip shows an increase from 7.75% at level 1 to 22.75% at level 5. This makes it a useful long-term goal once you have a reliable combat setup.
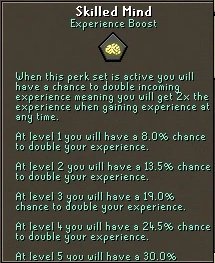
Skilled Mind — experience
This perk gives a chance for an experience action to award double experience. The illustrated tooltip shows the chance increasing from 8% at level 1 to 30% at level 5. It is worth inspecting if skilling is your main focus.
Working towards perk sets
Read the set requirements in the perk interface. Plan upgrades together so you can meet the required perk levels rather than spreading points across unrelated choices. Use any flexible slot for a perk that complements your current activity.
6. Choose a progression route
Route A: combat and Slayer
Start with easy PvM tasks and monsters you can kill efficiently. Bring food, keep your equipment appropriate for your levels and avoid spending your entire budget on one upgrade. Increase task difficulty when your damage and survivability make the next tier practical.
Slayer is a useful framework for early combat because it gives you a clear target. Pair your combat training with newcomer objectives, achievements and perk tasks where possible.
Route B: skilling and perk tasks
Choose a repeatable activity with supplies you can obtain consistently. Regular accounts can use trading to prepare; Ironmen should first establish their own gathering route.
When selecting a task, check three things:- Do you meet the level requirement?
- Can you replenish the required materials?
- Is the reward worth the time compared with a simpler task?
Examples to investigate as your levels grow- Smithing: repeatable equipment production, provided you have enough bars.
- Runecrafting: higher-level rune tasks once you have the required level, essence and useful equipment.
- Mining: ore tasks that fit the rocks you can access.
- Fishing: a steady supply of food while working towards eligible tasks.
If you use an experience-lock feature, make sure it suits your plan before enabling it. Avoid commands that empty your inventory unless you deliberately intend to discard its contents.
7. Upgrade with a plan
New equipment is most useful when it improves the activity you are already doing. First aim for a dependable weapon, suitable armour and enough supplies to complete your tasks. Larger upgrades can follow once you have a steady income or resource route.
Upgrade Station
Find the station at home and inspect its interface before committing items. Check the required materials, success chance and what happens to your items if an attempt fails. Never assume an upgrade is guaranteed.
Item Workbench
Review the available recipes and requirements. Gather the complete set of materials before starting and compare the result with other upgrades available to your account.
8. Set your next milestone
Once basic training and tasks feel comfortable, choose a goal that gives your account direction: a particular equipment upgrade, a collection log, a skilling milestone or your first boss.
Collection logs
Use ::clog to inspect available logs and their listed completion rewards. Pick content you can complete consistently rather than chasing the most demanding log immediately.
Combat achievements
Check the combat achievement interface and begin with objectives that fit your current equipment. Read the conditions carefully before an attempt so a successful kill also counts towards your goal.
Global bosses
Watch announcements for community encounters. Before joining, check how to reach the boss, what equipment and supplies to bring, and how deaths and participation rewards work.
Hardcore reminder: Confirm whether an encounter is safe for your status before participating. A group activity is not automatically a safe-death activity.
Your first-day checklist- Account type and difficulty selected.
- Starter items inspected and supplies organised.
- Newcomer tasks and achievements reviewed.
- Starter perk reward checked.
- First manageable perk or combat task completed.
- Votes and eligible streak rewards claimed.
- One realistic equipment or account milestone chosen.
Enjoy the journey, and welcome to BarrageRSPS!
If you need help, ask the community or post in the forum's Support section.
|
|
|
|
|
|
|